Gmail has become part and parcel of our day-to-day life. You cannot expect a corporate job where you don’t need to receive or send emails. Again, if you are a student, you need to use Gmail for academic purposes. Among the other email providers, Gmail tops the list for its multipurpose features. So, the number of its users is also flooding quickly. So you need to organize Gmail for your convenience.
How many emails do you receive in a day? Is it more than 100? Or is it limited? Whatever the number is, you must organize Gmail to keep your account clear and handy. There are lots of people who lost important emails due to mismanagement of the account. It can cause a great loss to anyone. I’m sure you don’t want to face such a situation! But how can you organize your Gmail? I’m showing you some simple tips to keep your Gmail account well-managed.
Best 20 Tips for Organizing Gmail
It is normal if your Gmail is overloaded with emails. You have to face many difficulties finding your important email in this situation. Also, it is tough to recognize the essential email among many new ones. However, you can solve this problem by learning to sort out the inbox. By following some easy hacks, you can organize your account. Let me show you the best tips. 
1. Sort Emails by Sender or use the Search Bar
You need to keep your inbox organized and well-assorted. Otherwise, finding a specific email you are looking for is tough. But Gmail has included an easy option to find your email. 
You can find all emails from a specific sender using the Sort by Sender feature. Just follow these steps-
- Right-click on an email sent by that specific sender.
- Select the ‘Find the email from’ from the drop-down menu option.
- You will find all the emails you have received from that sender using this process.
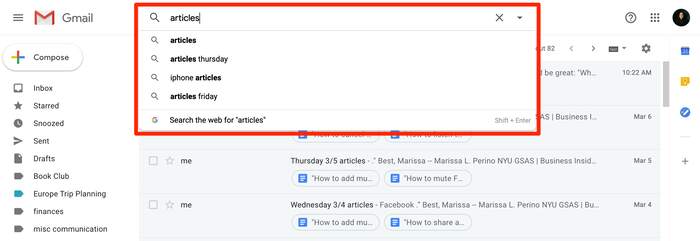
You can also use the ‘Search Bar’ feature to do the same task. The procedure is-
- Find the search bar of Gmail. It looks like a stack of switches.
- You will see a larger menu. Click the ‘From’ field and type the email address of the sender whose emails you want to find.
- You can also specify a date or time to find emails more accurately.
- Now, click the ‘Search’ option. You will get the required emails.
2. Cleaning Inbox
Cleaning your inbox is a great tip for organizing your Gmail. You might want to know whether it is possible to delete a large number of emails at a time. Yes, you can do that. Gmail offers you to select emails sorting by sender, email address, date, content, and so on. If you want to delete all emails from a specific sender, just visit the search bar and click the ‘From’ field. Now, type the sender’s name or email address. Select all emails and delete those at one. You can use this similar method after selecting emails sorted by date or content.
Deleting unnecessary big attachments can reduce a lot of space in your inbox. Besides, you can also select a specific category provided by Gmail. For example, you can choose all emails from the ‘Social’ category and delete them. In this way, you can delete a huge number of emails at a time. You can backup your important emails before cleaning your inbox.
3. Add Emails to Google Task
You can convert your emails into Google Tasks. It is an easy way to keep your important emails safe and secure. You have to select the emails you want to add to Google Task. Now, click the ‘More’ option on the screen. You will see the ‘Add to task’ option. After clicking it, you have to give the name of the task. You can also add details and specify a time or date to finish the task. Then save it. You can also set a reminder. This way, your important emails will be stored separately as different tasks.
4. Setup Multiple Email Views
You can sync your multiple email inboxes in a simple account. Google offers this feature to organize different Gmail accounts more efficiently. To use this method, follow the mentioned steps:
- First, you have to turn on the multiple inboxes option. Click the setting button at the top of the screen. Now, select the inbox type and click on the ‘Multiple Inboxes’ option.
- You can use the ‘Search query’ to filter the inboxes. It allows you to add labels to multiple inboxes to find them easily.
- It also offers you to enter separate names for each inbox.
- Select the position where you want to view the other inboxes.
- Now save the changes.
5. Select Layout
A good method to organize Gmail is to select your preferred layout for your inbox. You will find the setting option on the top-right corner of the page. Select the ‘Inbox’ tab there. It will offer you five different layout features.
- Default: This option sorts your emails according to date and time. It is the most used layout of Gmail.
- Important first: Gmail tries to predict the emails you find more important. It previews those emails at the top of your inbox in this layout.
- Unread first: Here, the emails you haven’t read will be displayed at the top.
- Starred first: If you use star marks for emails, this layout will display those at the top of your inbox.
- Priority inbox: This layout offers a combination of the formats mentioned above. Here, Gmail tries to predict your preferred types of emails and gives those a top view.
6. Add a Preview Pane
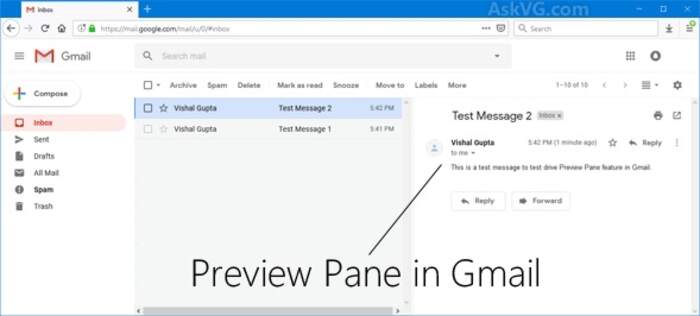
You can use the preview pane feature to save time. Generally, you news to enter the email to view it. But using the preview pane option, you will get a ‘preview’ option with the received emails. To apply this feature, you have to follow the steps mentioned below-
- Click the settings option. Now, select the ‘Labs’ button.
- You will find the ‘Preview Pane’ option there.
- Choose it and save the changes.
7. Create Labels
Creating labels is one of the best tips to organize your Gmail. You will find a button that looks like a shopping bag or an arrow. This option allows you to label your emails. You can also create different colored labels to make them more visible. This way, you may distinguish the most important emails from the lesser ones. After creating a label, a separate folder will be shown on the left side of your inbox. You can find your labeled emails there.
8. Create Filters
You can also use the filter feature of Gmail to keep it organized. It creates distinguished folders for the selected emails. You can also set options to send the same types of emails you will receive in the future to that folder. The required steps are-
- Select the specific type of email you want to filter. Now, click the ‘More’ button at the top of the screen. You will find the ‘Filter messages like this’ option.
- Choose that option. Then a filter box will appear. You can set the email address, content, receiving date, etc., of the email you want to filter.
- Now, tap the ‘Create filter with this search’ option. You can also choose different options like skipping inbox, making a custom folder, etc. Then tap the ‘Create filter’ button.
9. Archive Emails
You can avoid less important emails by using this feature. It allows the emails to skip the inbox. The steps are very easy-
- First, select the email you want to archive. Now, click the arrow sign pointing down. It signifies the ‘Archive’ button.
- Here, you will find a filter box. You can add different categories to select more emails.
- Now, choose the ‘Skip the inbox’ option. Your emails will be removed from the inbox. But they will not be deleted.
In this method, the unnecessary emails will not bother you. Those emails will be stored safely elsewhere. You can find them anytime. That’s why archiving emails is a better way than deleting them.
10. Create Nested Gmail Labels
Nested labels signify the creation of sub-folders. You can make different folders under a specific label. It will make your inbox more specified and organized. You may use new names for the nested labels.
11. Unsync several Gmail Accounts
Another way to organize Gmail is unsyncing several Gmail accounts might make your account more organized. To do this, follow these steps-
-
Open the Gmail app.
-
Now, select the setting option. Click on the ‘Manage account’ button.
-
Tap the account for which you need to change the inbox settings.
-
Click on the ‘Change mailbox sync settings’ option.
-
You can turn on or off the emails under the sync option from the settings.
-
Now, save the changes.
12. Prioritize Emails
Starred emails make them highly prioritized. Again, you can use the machine learning skill of Gmail to detect your priority list. From the inbox settings, you can select the priority-based layout. It will divide your inbox into three priority-based categories- Unread and important, starred, and others.
13. Use Confidential Mode
To keep your email more secure, you can use the confidential mode. After writing an email, click the ‘Clock’ icon at the bottom of the screen. You can set a time or passcode to make some emails confidential.
14. Use Dots in the Gmail Address
Gmail makes no difference if you put any dots in the address. So, You can represent your Gmail address using various layouts. Suppose your email address is [email protected]. You can also refer to it as [email protected]. These two addresses are actually the same. But, you can use the dotted address to specify a special category of emails. Use the filter option to apply this method. Of course, put the dots before the @ sign.
15. Create Email Aliases
You can also modify your email address using different aliases. For example, your real email id might be [email protected]. You can change it to [email protected], [email protected], and so on. It will help you to filter emails easily. Besides, you can also find out the source of your email leakage if you receive lots of spam in a specific alias.
16. Explore Gmail add-ons and Extensions
Different Gmail add-ons and extensions will give you a better user experience. The most recommended add-ons are-
- Inbox Pause: This feature stops receiving emails until your next command.
- Checker Plus for Gmail: It notifies you about emails from multiple inboxes.
- Auto Text Expand: This feature allows you to type some email by suggesting words and phrases quickly.
17. Make Unread Emails more Visible
You might use this feature if you want to view unread emails at the top of your inbox. Go to the settings option first. Then tap on the inbox tab. Now select the default inbox type. It will recognize the unread emails as your topmost priority. So, you can find them more easily.
18. Learn Gmail Keyboard Shortcuts
You can save lots of time by learning this technique to organize Gmail. You don’t need to use a mouse frequently if you know the shortcuts. One can easily handle the actions by applying these tricks. For instance, you can press ‘r’ to reply, ‘#’ to delete, ‘!’ to mark an email as spam, etc.
19. Mute Annoying Email Threats
To restrict the annoying emails, you can use the ‘Mute’ feature. Open the email and click the ‘More (three vertical dots)’ option. Find the ‘Mute’ button and click it. You can view the muted email by visiting the ‘All Email View’ option. So, you can unmute any email whenever you want.
20. Use Multiple Gmail Accounts
There are no restrictions on creating new Gmail Accounts. So, you can open many accounts as per your needs. It helps you differentiate between the accounts used for personal and office purposes. Also, you can use the multiple inbox view feature to sync those accounts.
Final Thoughts
A Gmail account is a necessary tool to perform our daily activities. So, keeping it organized is also a vital task. The 20 tips mentioned above will help you keep your account clean and organize Gmail. You can also use the account more smartly by following these hacks. If you find this article useful, please leave a comment. I’ll eagerly wait for your feedback!


