


Memory Leak Windows 10 is like the brain drain of the computer that causes unstable and unpredictable systems. It happens because of a poorly designed application. Failing to free up memory segments is another problem. The memory leak starts when an application requests to use memory from the operating system.
Even if you have enough RAM and aren’t running software that uses many resources, performance will probably suffer if you don’t use all of the RAM. This “memory leak” problem happens when the software doesn’t use the RAM correctly.
When the computer runs, the software uses RAM in a way determined by how much memory is needed. If a program doesn’t need a RAM resource anymore, it “returns” it so that it can be given to the next program when required.
When there is a memory leak, the program may use all your RAM even if you are not using it. As this goes on, a lot of RAM, or even all of it, can get caught up in this broken process. In the end, this is because of a bug in the software.
Unfortunately, no version of Windows pops up a message telling the user that memory is leaking, making it hard to find the problem. But the system may show different signs that there is a leak. There may be a drop in performance, a slowdown that makes it impossible to open more programs, or the computer may stop working.
Today, we’ll talk about what happens when memory leaks occur and show you how to quickly fix the problems with Windows 10 and 11 that cause memory to leak.
The Impacts of Memory Leak
There will usually be no immediate symptom if a program has a memory leak and its memory usage steadily increases. Every physical system has a limited amount of memory.
If the memory leak is not contained (for example, by restarting the leaking program), it will cause problems in the future. Most modern consumer desktop operating systems include primary memory (RAM microchips) and secondary storage (hard drives).
Memory allocation is dynamic. That means each process receives the amount of memory it requests. Dynamic pages are moved into the main memory for quick access. While inactive pages are moved to secondary storage as needed.
When a single process consumes a large amount of memory, it typically occupies more and more main memory, pushing other programs to secondary storage and significantly slowing system performance. Even after terminating the leaking program, it may take time for other programs to swap back into the main memory and the routine to return to normal.
Some operating systems have a per-process memory limit to prevent a single program from consuming all of the system’s memory. The main disadvantage of the system is that the operating system must occasionally be reconfigured to allow the proper operation of programs that legitimately require large amounts of memory, such as those dealing with graphics, video, or scientific calculations.
The operating system will almost certainly fail if a memory leak occurs in the kernel. Computers that lack sophisticated memory management, such as embedded systems, may fail due to a persistent memory leak.
Fix Memory Leak Windows 10 And 11 Quickly
Although there are a few memory leaks in Windows, the most common problem is standby memory. The standby memory issue has existed since Windows 7 and is still current in Windows 10/11.
When your standby memory consumes all your free memory, your system may begin to lag and even crash because a software bug or glitch usually causes a memory leak.
1. Check what is causing the Memory Leak
Microsoft has resolved the memory leak issue in Windows Explorer on Windows 11. You can check to see if you are still affected, then follow the procedure. Here are the ways to Check for Memory Leaks in Windows 10 & 11.
- Open the “Run” by pressing the “win+R” keys together
- This will launch the Windows “Run” box
- In the “Run” box, type in “resmon.”

- This will open the resource monitor.
- Now, navigate to the “Memory” tab and examine the “Standby” memory. Make sure that all apps and windows are closed. With no active apps running and File Explorer closed, Standby memory should be freed up and memory usage reduced. If the Standby memory remains high, you are experiencing a memory leak on Windows 10/11.

Using the resource monitor, you can now check for the programs leaking memory in your Windows 10/11 PC and solve the issue with this information.
2. Run the Windows Memory Diagnostic
If Windows 11 crashes or freezes for no apparent reason, it’s most likely due to faulty RAM on your computer. Windows 10/11 includes a built-in Windows Memory Diagnostic tool that runs several basic and advanced tests to ensure the RAM’s reliability. We’ll use this tool to look for potential memory problems.
- Open Windows search and search for Windows Memory Diagnostic
- Open the Windows Memory Diagnostic

- You will see two options in the Windows memory diagnostic tool, and I recommend the restart option.
- Click restart; your PC will now reboot.
- Your computer will restart automatically after the memory test. Log in to your computer to see the test results. Search for “Event Viewer” by pressing the Windows key once. Open it now.

- Expand “Windows Logs,” then open the “System” logs.
- Now, scroll down to find “MemoryDiagnosticsResults.”
- Please open it and look over the results. If it says there are no errors in your memory, you should look for the root cause elsewhere. If the tool detects a mistake, you may need to replace the RAM.
But always remember that this tool will do the basic troubleshooting and will not solve the hardware-level issues if you have any.
3. Try the “MemTest86” app
If you are dissatisfied with the native Windows Memory Diagnostic Tool, try the MemTest86 app, the top contender in our list of the best tools for stress testing RAM. It has over 13 algorithms and searches for all possible hardware errors in RAM. 
MemTest86 will help you determine which program is causing a memory leak. This app comes in a free version too. However, You will need an extra USB drive to run this app.
Download the app here.
4. Defrag Your Hard Drives
Defragment software programs arrange the bits of data that comprise your computer’s files so they are stored closer together. This system allows your hard drive to access files faster.
- Go to “This computer.”
- Right-click the current system hard drive and select Properties
- Navigate to the Tools tab and select Optimize.

- Choose Analyze after selecting the drive to defrag.
- Wait for the process to complete.
- Restart your computer.
This process will optimize your drives to run them to the optimal performance & solve the memory leak problem.
5. Restart File Explorer to Fix the Memory Leak
When Windows 11 was released, the File Explorer app was the first to report memory leaks. When you try to open way too many Files Explorer windows, Windows will consume a lot of RAM. It would be best to try not to open too many Files Explorer windows.
- To resolve the memory leak issue in Windows 10/11, close all File Explorer windows. Close all windows by right-clicking on the File Explorer icon in the Taskbar.
- Then, to open the Task Manager, press “Ctrl + Shift + Esc.” Then, on the “Processes” tab, find “Windows Explorer.” Right-click it and select “Restart.”

This will restart Windows Explorer, freeing up even more RAM on Windows 10/11.
6. Update File Explorer Folder Options
Some users claim that opening folder windows in a separate process helps resolve the memory leak issue in Windows 10/11. Try the steps listed below to see if they help.
- To open the File Explorer, press “Windows + E.” and Open “Options” by clicking the three-dot menu in the top menu bar.
- Navigate to the “View” tab and scroll down to “Advanced settings.” Enable the “Launch folder windows in a separate process” checkbox now.

- Finally, click “OK” and restart your computer.
With this process, Windows 10/11 should no longer reserve an unusual memory for File Explorer.
7. Disable programs that run at startup
Startup programs are programs that run when a computer boots up. This is an excellent habit to develop for programs that you use frequently. It relieves you of the stress of searching for those programs or, in some cases, manually installing them. When some programs install for the first time, they include this feature by default.
- To open Task Manager, press CTRL + SHIFT + ESC.
- Navigate to the Startup tab.

- Select Disable after clicking on the program you want to disable.
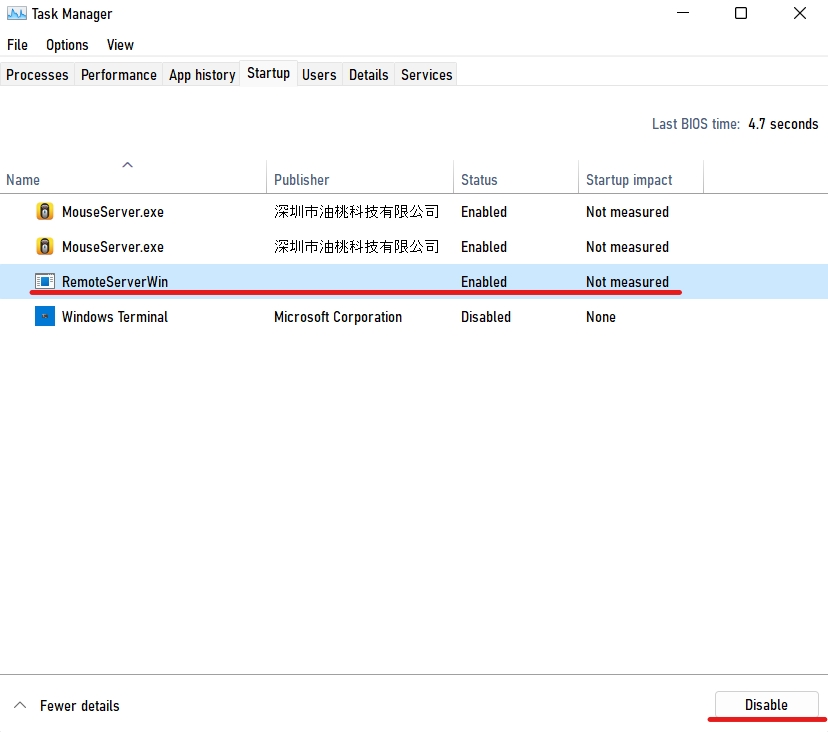
- Restart your computer.
A memory leak-causing program running on startup is a lethal combination. You’ll get stuck in a loophole where the problem keeps reappearing no matter how often you temporarily solve it. To resolve this issue, turn off the troublesome program at startup, which will no longer cause us problems automatically.
If the Task Manager has already shown you which program is leaking memory and it also happens to run on startup, turn it off, and you should be good to go.
8. Increase Your Virtual Memory
Virtual memory is a technique in computer operating systems (OS). Virtual memory enables a computer to compensate for physical memory shortages by temporarily transferring data from random access memory (RAM) to disk storage. If your physical memory is limited, you can increase your virtual memory size, known as “swap.”
Windows 11 will use some complex disk sectors as RAM when your computer’s memory is low. This will significantly assist you in combating high RAM usage on Windows 11. Here’s how to do it.
- First, press the Windows key once and type “advanced system” into the search box. Open “View advanced system settings” now.
- Click on “Settings” in the “Performance” section of the “System Properties” window.
 to disk storage.")
- Move to the “Advanced” tab in the next window and click on “Change” under “Virtual memory.”

- Now, Untick the ‘Automatically manage paging file size for all drives checkbox.

- Select “Custom size” at the top. Enter what is recommended below in the “Initial size” field. For example, I’ve made “1657” the default size. In the “Maximum size” field, enter 4096. This will add 4GB of virtual memory to your Windows 11 computer.
- Now, select OK.
- Finally, restart the computer, which should solve the low RAM issue on Windows 11.
You can set The maximum to three times the physical memory. So, if your PC has 8GB of physical RAM, you can configure up to 24GB (24576 MB) of virtual memory.
9. Update outdated PC Drivers
A driver, also called a “device driver,” is a group of files that tell a piece of hardware how to work by talking to the computer’s operating system. Every computer hardware needs a driver, whether it’s an internal part like your graphics card or an external one like a printer.
Memory leak problems can happen if your drivers are out of date. Try not to use apps that update drivers from outside sources. Use Windows Update to try to update your drivers. Windows updates give you the best and most stable driver, which can fix your memory leak problem. I always suggest the drivers from WHQL.
The Reason Behind Updating WHQL Drivers?
Windows Hardware Quality Labs is what WHQL stands for. The Labs offer a variety of hardware and software test suites, including suites that let device drivers be tested and signed.
A signed driver is considered stable and ready to use on a specific operating system, like Windows 10/11, and Microsoft lets the vendor say that it is “Designed for Microsoft Windows 10/11.”
If a product meets the requirements for compatibility, it can also have a Windows logo on its packaging, ads, and other marketing materials. This signature shows that the product meets Microsoft’s requirements and will work with Windows operating systems. So, I suggest that you use the WHQL-signed drivers on your PC.
1. Try removing malware from your PC
Malware is a file or code infecting, exploring, stealing, or performing any behavior an attacker desires. Because malware comes in such wide varieties, there are numerous ways to infect computers.
Malware and other types of malicious software, like outdated drivers, are the source of many known problems in Windows, including memory leaks. As a result, malicious software infects your computer. It will undoubtedly perform poorly (depending on the malicious software type). In this case, the only logical thing to do is clean up these unwanted guests’ PCs.
Open Windows Defender and perform a full system scan. At the end of the scan, the antivirus will notify you of the results and give you the option to quarantine or remove the threat. We do, however, recommend that you use third-party antivirus software.
Dedicated tools can typically detect and remove far more threats before they negatively impact your system. Fortunately, many Windows 10/11 compatible antivirus software can protect your system without hogging system resources or imposing unnecessary restrictions. Most antivirus software includes a quick scan feature, so after installing your tool, run the quick scan and allow the software to remove any threats it finds.
Close Unused Browser Tabs and uninstall apps
As you open apps and browser tabs on Windows, they will need sufficient RAM to function correctly. Most users open apps and then forget to close them when finished. You should check your PC for unnecessary apps and browser tabs and close them. To prevent this problem, you can use an extension, which suspends opened accounts after a certain period.
Conclusion
The only long-term fix is to get software updates for any programs or drivers leaking memory, which will fix the problem. In an ideal world, leaks wouldn’t happen, but they sometimes occur as software gets more complicated.
Most of the time, a leak will cause the app that caused it to crash (this has happened with many games played for hours, eventually leading to a crash-to-desktop, at which point the memory is reclaimed). But many other things can play a role. If you keep getting “out of memory” errors, use the tools above to monitor how much memory you’re using. And you’ll likely find a leak.
If you just started having this problem with your PC, try all our solutions. Your PC is still running slowly. Most likely, the amount of RAM installed is to blame. When your computer doesn’t have enough “RAM” to handle everything, the best thing to do is to upgrade the RAM. Upgrade your RAM if you want your PC to work usually. As you add more RAM, your system memory will get bigger, and it can handle even more demanding tasks. Our article about memory leaks in Windows 10/11 has come to an end. I hope this article helped your computer and you were able to fix the problem.