


Did you know that a wireless mouse not working in Windows 10 is a very common problem for windows 10 users? If you’re having trouble connecting your mouse to your computer, there are a few things that you can do to try and fix the issue. This article will walk you through the steps that you need to take to connect your wireless mouse to your computer.
Wireless mouse not working in Windows 10 – Solution
A trouble in Windows 10 is a common problem for users. There are a few things that users can do to try and fix the issue. The steps that users need to take depend on the situation.
Solution 1: Try some basic things first
1. Change the receiver port
Your USB mouse is not working on the laptop or PC due to a damaged receiver port. So change the mouse receiver port. Many experts recommend that if you try at the backside port of your pc, it provides more power supply.
Change the battery
2. Wireless mice work by sending a signal from the mouse to the computer, and a battery in the mouse keeps the receiver powered up. If the battery is low, the mouse won’t work at all. You can replace the battery in your Clarke wireless mouse.
3. Fix the hardware damage
Bluetooth mouse not working if there any hardware issue such as cracked housing, sticky switches, missing ball, optical sensor damage, etc. You may need to replace the mice if there is obvious damage.
4. Make sure your computer is within range
If you are experiencing issues with your Windows 10 mouse not working, ensure that your PC is within range of the mouse. You can check this by opening the “Network and Sharing Center” app and clicking on “View active networks.” From here, you can see which devices are connected to your network and their respective signal strengths.
Solution 2: Enable the Mouse
If your wireless mouse is not working in Windows 10, then there is a very simple solution to enable it. By following these simple steps, you can easily activate your Clarke wireless mouse and start using it without any issues.
Step 1: Write device manager on the windows search box and open “Device Manager.”
Step 2: Now select your PC name.
Step 3: Select “Mice and other pointing devices”.
 Step 4: Check HID-compliant mouse is enabled or disabled.
Step 5: Click and hold shift+F10 to open the submenu or properties.
 Step 6: Now choose Enable Device and push the Enter button.
Step7: Now check your mouse whether it is working or not.
Solution 3: Reinstall the driver
If your Bluetooth mouse not working properly in Windows 10, You can find the installation files for most wireless mice on the manufacturer’s or Microsoft’s website. Follow the steps given below –
Step 1: Press the Windows Key & X keys on the keyboard to access Device Manager.
 Step 2: Now select Mice and Other Pointing Devices, right-click on it, and choose Update Driver
![Wireless Mouse Not Working in Windows 10 [Solved]](https://www.fossguru.com/wp-content/uploads/2022/05/Now-select-Mice-and-Other-Pointing-Devices-right-click-on-it-and-choose-Update-Driver.jpg "Wireless Mouse Not Working in Windows 10 [Solved]") Step 3: Select Browse my computer for driver software.
Step 3: Select Browse my computer for driver software.
 Step 4: Now choose your driver from your computer.
 Step 5: Unselect Show Compatible Hardware and click next.
 Step 6: Select Yes to perform the action.
![Wireless Mouse Not Working in Windows 10 [Solved]](https://www.fossguru.com/wp-content/uploads/2022/05/Update-driver-warning.jpg "Wireless Mouse Not Working in Windows 10 [Solved]") Step7: Your computer will restart automatically. Then open the option Show compatible hardware. Now choose the preferred driver and click next.
Step7: Your computer will restart automatically. Then open the option Show compatible hardware. Now choose the preferred driver and click next. 
Solution 4: Disable the startup option
Follow the steps given below to disable the startup option:
Step 1: Open the setting menu.
Step 2: Click on the System option
 Step 3: Select the option Power & Sleep segment then choose Additional power settings.
Step 4: Now select the option “Change settings that are currently unavailable.”
Step 5: Unselect the option “Turn on fast startup.”
 Step 6: Now restart your PC.
Solution 5: Update the driver
If your wireless mouse isn’t working properly in Windows 10, try updating the driver. Sometimes an outdated or defective driver can cause a conflict between the hardware and the operating system, resulting in a lack of functionality. Follow the steps given below to update your driver:
Step 1: Download Bit Driver and install it on your operating system.
Step 2: Select scan driver to check for the outdated driver.
 Step 3: If your mouse driver is outdated, it will show in the Bit Driver box. Now select your mouse from the box and click on Update Now.
Step 4: Restart your computer.
Solution 6: Update your windows
Sometimes the wireless mouse didn’t work properly because of the outdated operating system. Make sure you have the latest updates installed on your computer. This will ensure that all the necessary drivers and software are up to date and that the wireless connection is functioning correctly.
Follow the steps given below to update your windows –
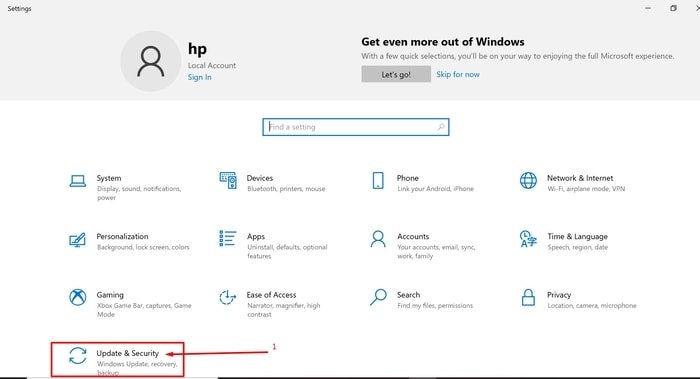
Step 1: Go to the Window setting or press Win+I.
Step 2: Now choose the option Update & Security.
 Step 3: Click on Check for Update
 Step 4: The Windows system installs the updates automatically after detecting them automatically.
Why does my wireless mouse not work in Windows 10?
If you’re experiencing problems with your wireless mouse, there are some potential causes such as –
- Hardware damage
- Outdated mouse driver
- Outdated operating system
- Power loss problem
- Connectivity issue
- Incorrect installation of the drivers
FAQs
Why is my mouse not moving?
First, make sure that your mouse is plugged into the computer and that the cable is connected properly. Next, make sure that your mouse is turned on and that the battery is fully charged. If you still cannot get your mouse to work, try restarting your computer. If all of these troubleshooting steps fail to fix the issue, you may need to replace your Wireless Mouse.
Why is my mouse slower?
There are a few potential reasons why your mouse might be slower than usual. Including a reduced number of buttons, the mouse is out of battery, a worn-out mouse wheel, a dirty sensor, a defective USB cable, or a slow computer.
How do I unfreeze my HP mouse?
If your HP mouse is frozen, you should remove the battery and plug the mouse into a power source. If that doesn’t work, you should try to remove the mouse’s motherboard. Afterthat, if those methods don’t work, you might have to send the mouse in for repairs or replace your mouse.
How long should a wireless mouse last?
Generally, a wireless mouse will last around 1 to 2 years if you’re using it daily and 2 to 3 if you’re using it less frequently. Keeping the mouse clean and free from debris is important, as this can negatively affect its performance. If you notice any problems with the mouse, take it to a reputable technician for a check-up.
How do I know if my wireless mouse is dying?
The most common signs that your wireless mouse is dying are that it is not connecting to the computer as often as it used to, buttons not working properly, getting slower day by day, or the cursor is moving slowly or erratically. If you notice any of these signs, it is important to take action and replace your mouse as soon as possible.
How do I reset my g502 mouse?
First, reboot your computer. Next, disconnect your mouse from the computer and plug it into a different USB port. Finally, click on the “Ease of Use” menu and select “Reset Device.” This will reset your mouse to its factory settings. If these steps do not fix the problem, you may need to contact customer service for further assistance.
How do I know the DPI of my mouse?
To find the DPI of your mouse, open the Mouse and Keyboard Properties window by clicking on the Start button and typing “mouse” into the search bar. After entering the mouse, press Enter. The Mouse and Keyboard Properties window will open. On the left side of the window, under “Devices,” you will find “Mouse.” On the right side of the window, under “Permissions,” you will find “DPI.” The DPI value for your mouse will be listed next to “Current DPI.
Final Thought
That’s it. I hope you find this post useful and resolve the problem of the wireless mouse not working in Windows 10. If you have any queries, feel free to share them in the comment box, and we will try our best to answer all your question. Please share this useful information with your friends if you liked this article. Thank you.